Trying to recover MXIII G II S912 TV Box from what looks like corrupted/dead internal memory

Initial title:
MXIII G II S912 TV Box dead internal memory , how to make CoreELEC bootable from SD card only?

It seems like the internal memory of my box died so if I flash a S912 CoreELEC img to a SD card it just doesn’t boot because I suppose it uses something from the internal memory to boot and mine is dead so it won’t boot.

I need a detailed guide on how to make CoreELEC boot from only the SD card itself.

Problem that initial title was asking for solved here

OK so let’s recap :

1.My box stopped booting at all while I was using android(It does not boot at all,I get no video signal, no recovery mode, no nothing).
2.It did boot some images from the SD card though(TWRP,Armbian)
3.CoreELEC didn’t boot from SD.
4.I added aml_sdc_burn.UBOOT to the SD and then it booted to CoreELEC(with dd).
5.I then tried to add recovery.PARTITION on the internal memory via ssh while running CoreELEC so I don’t always have to manually add aml_sdc_burn.UBOOT to each CoreELEC image I flash to the SD,but it still wouldn’t boot.
6.I also tried to run “installtointernal” over ssh while running CoreELEC on the SD card with the added uboot file and I got:

One of BOOT, SYTEM, DATA or DTB partitions is missing.
Make sure that you are using a correct device tree and a device with internal memory!

Mention1: When it boots the box boots without pressing the AV port reset button.
Mention2: I tried burning the firmware image on the SD but it would fail around 5%.

Are you sure that the internal memory is broken? How did you recognize the mistake? What happens when switching on, does the LED on the front panel light up? Maybe you just killed the bootloader.:slightly_smiling_face:

So, I was using my box as usual then it froze so I unplugged and replugged it in,the led was lighting blue but I got no video input from it anymore.Then I tried a different power supply adapter, the blue led was still on and still no video.Then I plugged it in via usb in my pc and tried to flash a new firmware on it with " Amlogic USB Burning Tool".
I tried 2 or 3 firmwares but all would get the same result.
The box was getting recognized by the tool, then the flashing procces would start and go on until 7% which is formatting and then it would fail.
So I burnt the firmware on a SD card with “Burn Card Maker” tool , which would set up some sort of boot thing on the card itself instead of relying on the internal memory to boot.
I inserted the card in my box and this is the first time I got video signal from the box.
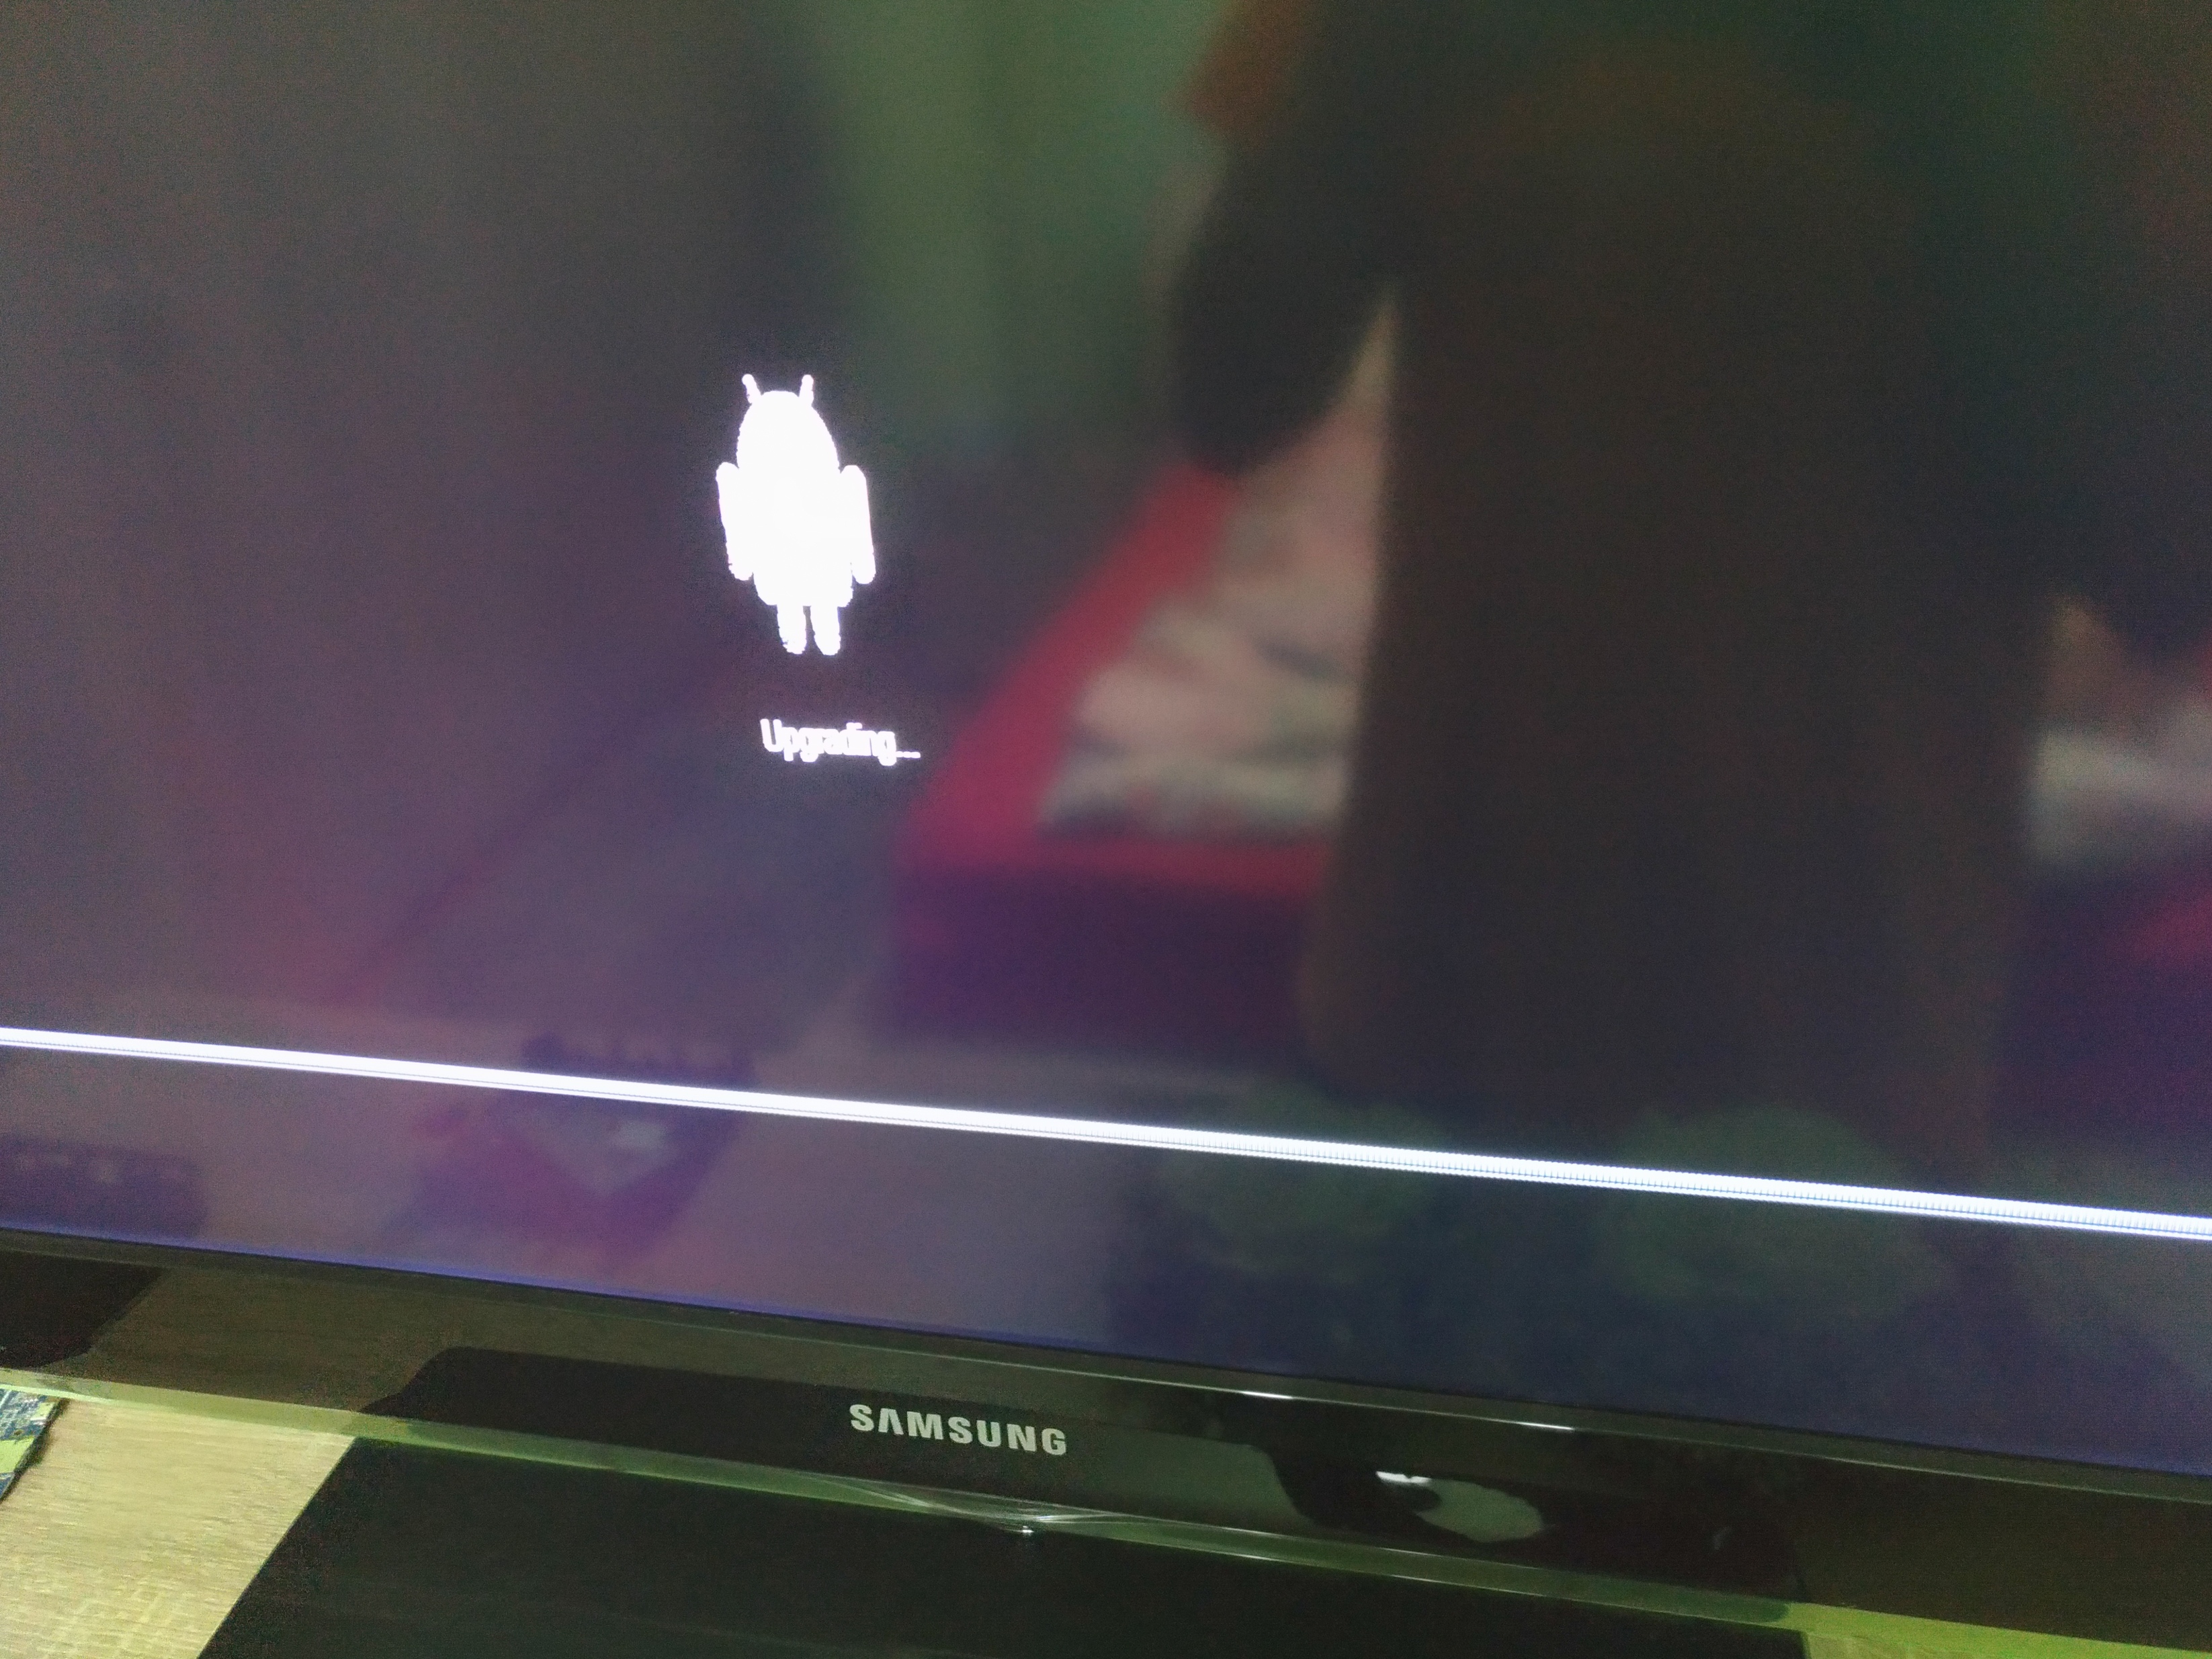
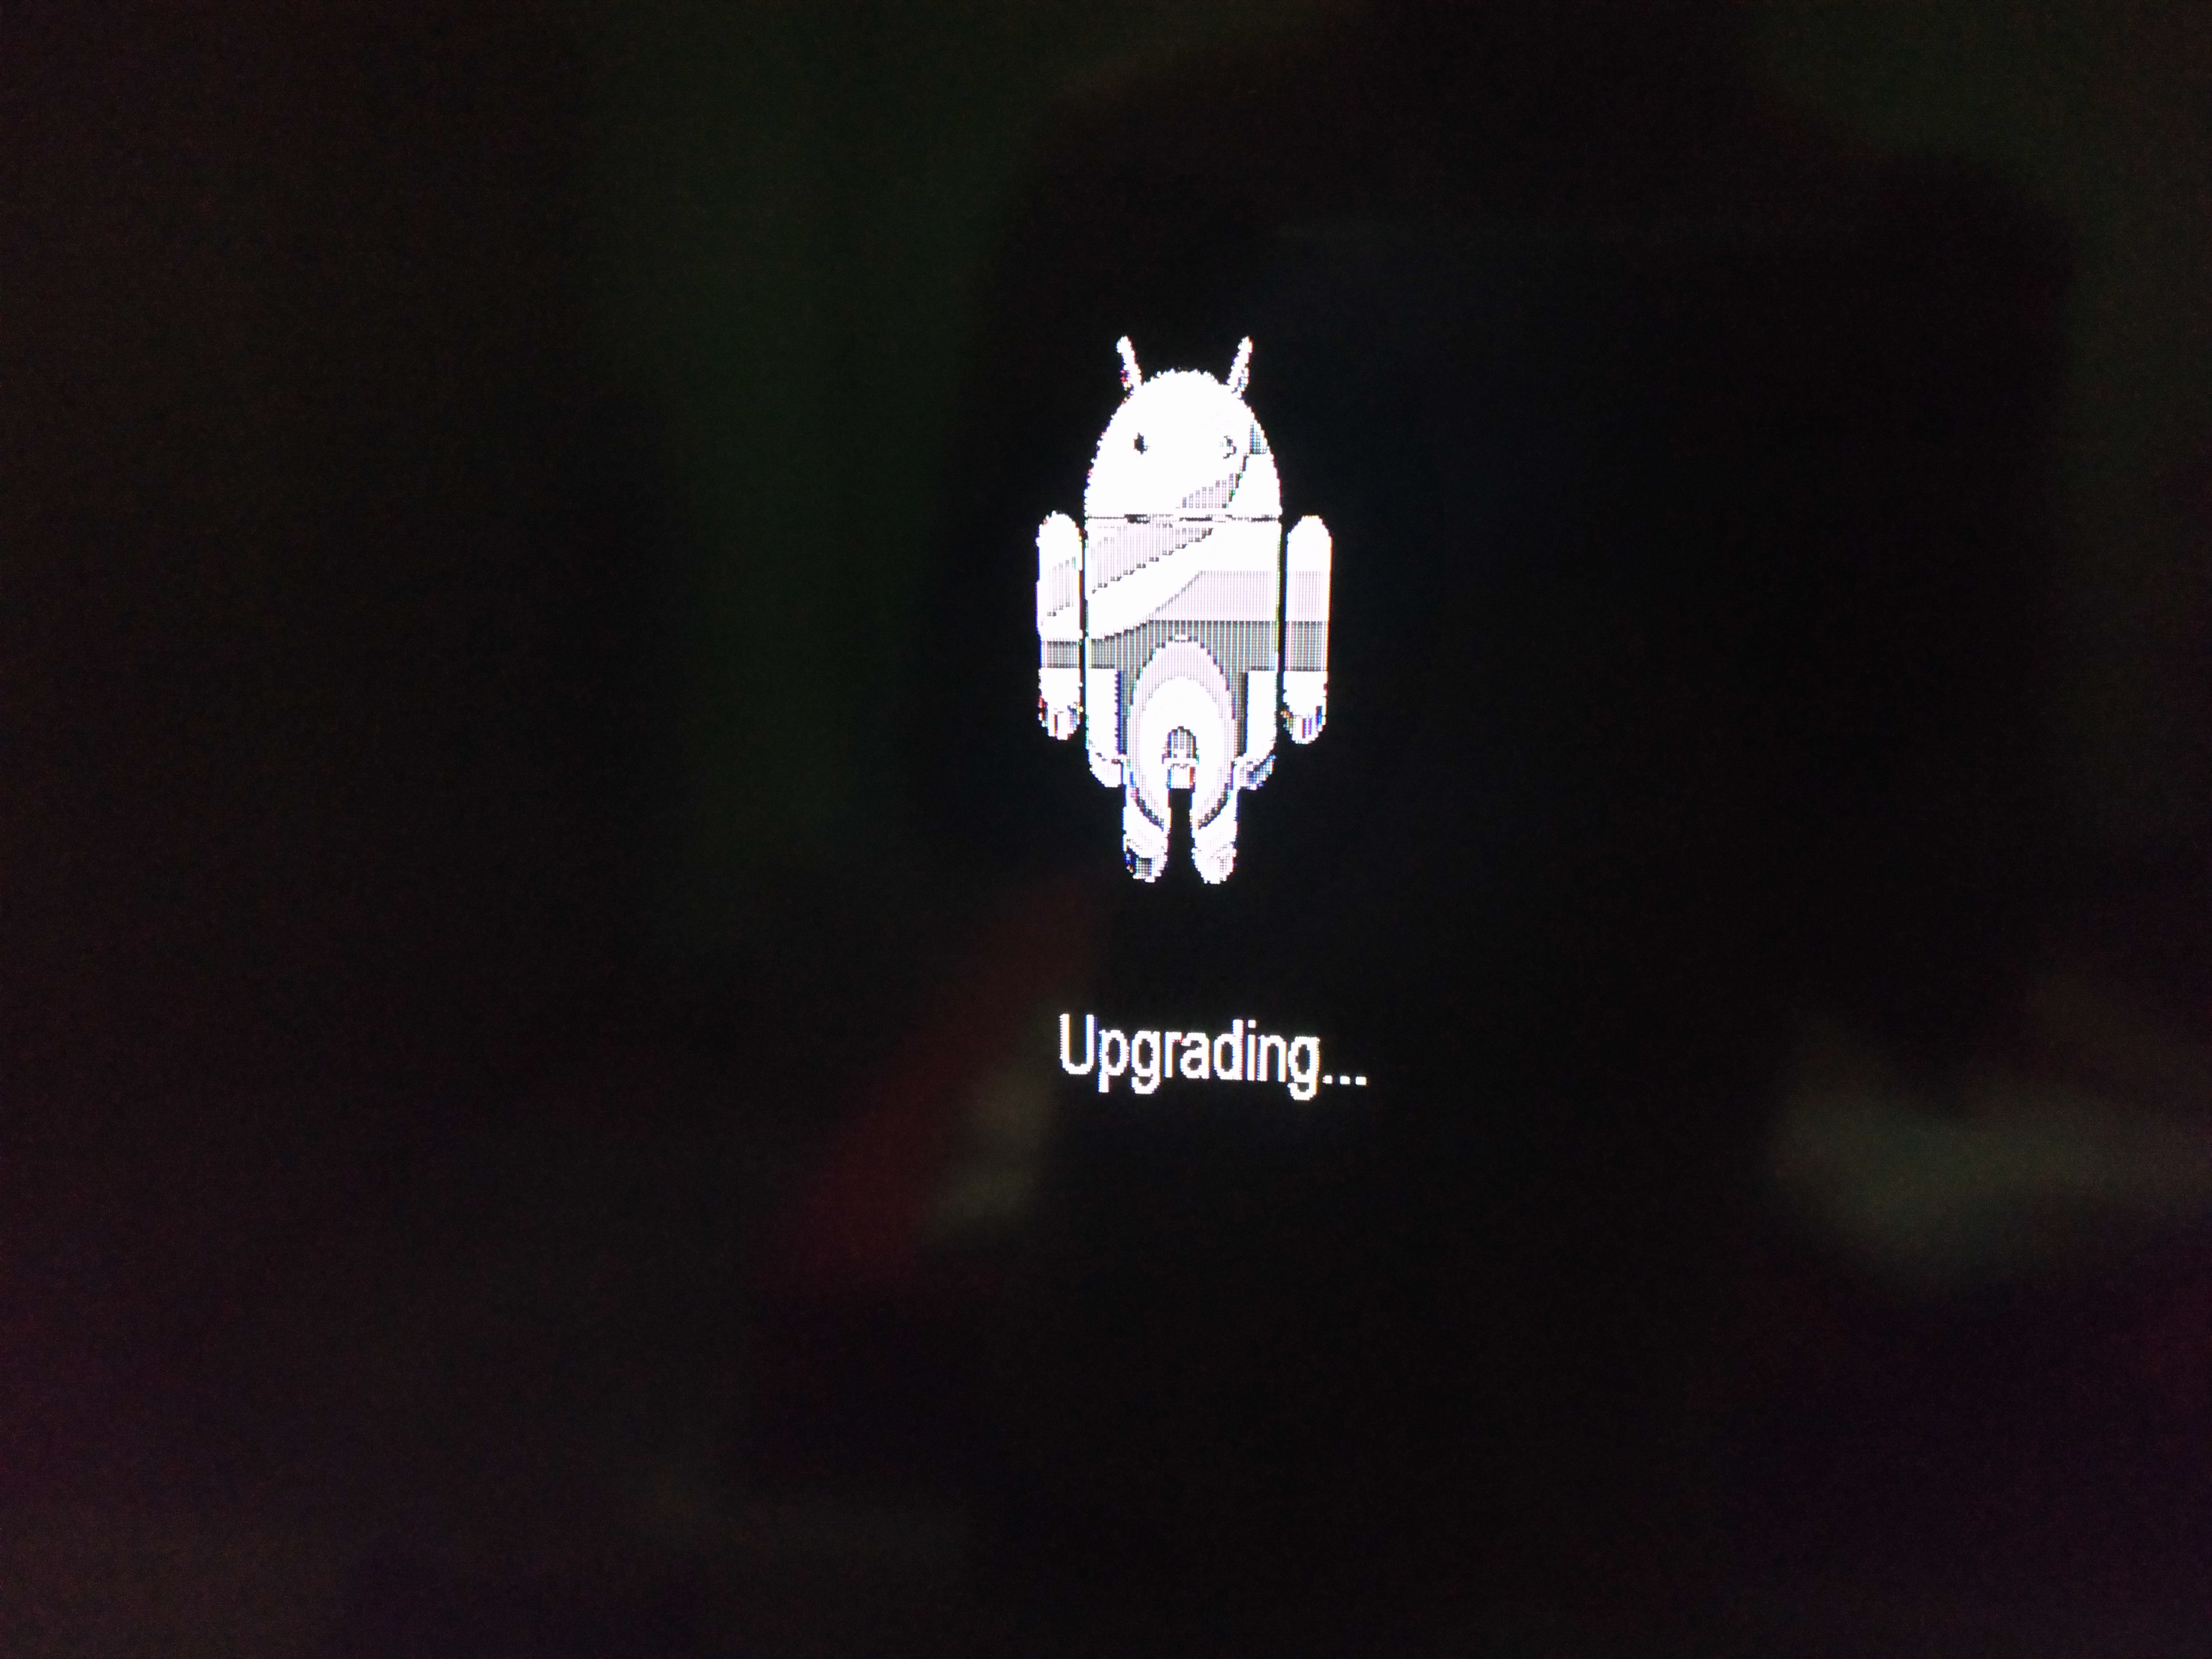
It was showing a android robot , below it it would say “Upgrading…” and a progress bar, although the video was very artifacty the droid was not green the progress bar neither, they were gray.

The progress bar would go on to like 5% and then got stuck there forever(I suppose it was being stuck at formatting).

So at this step I put an TWRP image on the card and renamed it recovery.img, put that into the box and again I got video signal, TWRP was working fine , the colors were fine everything was ok.

So at this point I figured out that most probably the internal memory died when I plugged the box out and then in, but everything else works fine so I could try to burn a OS on the sd card.

I discovered LibreELEC then CoreELEC and tried both of them.
I would burn the S912 version on the card with either “Win32DiskImager” “LibreELEC SD Creator” or “Etcher”.
Tried with each of them and tried every dtb file there was but the box never booted and I never got any video signal from it.

Then I burnt the Le Potato CoreELEC on the SD card,put that into the box and it booted and got video signal , I saw the CoreELEC logo and it said something about formatting partition, it did that then it powered itself off.I plugged the box out and replugged it in and now the CoreELEC logo would show again and its version, but it would never boot into Kodi , it would get stuck there forever.

I then tried the KVIM and KVIM2 versions of CoreELEC , got the box to boot , got video signal but I could only see a black or a green screen.

Then what I did is I flashed the SD with the Le Potato version and overwrite its files with the S912 version,except the dtb which if I would change the default Le Potato one for another it would just show a black screen.

However with the S912 files written over the Le Potato burnt SD card and using the default Le Potato dtb file, I was getting to the CoreELEC and version logo again and it froze there.

I tried the same but with LibreELEC written over Le Potato burnt SD, and got the same result, it was getting stuck at the LibreELEC logo.

So what I want now is to make the S912 version boot from the SD only without relying on something on the internal memory, like the KVIM and Le Potato versions do, and maybe that way it would work with my own dtb.

I found this guy who had the same problem but I can’t figure out exactly what he did , I would need an in depth guide, step by step because I am very unfamiliar with this sort of stuff

If the NAND has become corrupted in some fundamental way it can usually be cleared by shorting two pins together on the NAND chip. This will be specific to the NAND chip which you will have to identify first. Once the NAND has been blanked it is usually possible to flash an Android ROM using the USB-burn tool.

Shoog

Should I shorten all the pins two by two?

This is a picture of the board :

I tried shortening all of them two at a time then retried flashing with USB Burning Tool, it still stops at formatting.
This is the log

log

[19:35:16 167][Global][Inf]–Scan usb device
[19:35:16 167][Global][Inf]–Aml scan WorldCup Device
[19:35:16 168][Global][Inf]–Host: Intel(R) 7 Series/C216 Chipset Family USB Enhanced Host Controller - 1E2D
[19:35:16 168][Global][Inf]–DevPath:\?\pci#ven_8086&dev_1e2d&subsys_77981462&rev_04#3&11583659&0&d0#{3abf6f2d-71c4-462a-8a92-1e6861e6af27}
[19:35:16 168][Global][Inf]---->Roothub:USB#ROOT_HUB20#4&872a236&0#{f18a0e88-c30c-11d0-8815-00a0c906bed8}
[19:35:16 168][Global][Inf]-------->[Port0]USB#VID_8087&PID_0024#5&36eec816&0&1#{f18a0e88-c30c-11d0-8815-00a0c906bed8}
[19:35:16 168][Global][Inf]---------->[Port0]NoDeviceConnected
[19:35:16 168][Global][Inf]---------->[Port1]USB#VID_03EB&PID_3301#6&60e20e2&0&2#{f18a0e88-c30c-11d0-8815-00a0c906bed8}
[19:35:16 171][Global][Inf]------------>[Port0]Other device
[19:35:16 171][Global][Inf]------------>[Port1]NoDeviceConnected
[19:35:16 171][Global][Inf]------------>[Port2]NoDeviceConnected
[19:35:16 172][Global][Inf]------------>[Port3]Other device
[19:35:16 172][Global][Inf]---------->[Port2]Other device
[19:35:16 172][Global][Inf]---------->[Port3]\?\usb#vid_1b8e&pid_c003#6&60e20e2&0&4#{a5dcbf10-6530-11d2-901f-00c04fb951ed}
[19:35:16 172][Global][Inf]---------->[Port4]NoDeviceConnected
[19:35:16 172][Global][Inf]---------->[Port5]NoDeviceConnected
[19:35:16 172][Global][Inf]-------->[Port1]NoDeviceConnected
[19:35:16 173][Global][Inf]–Host: USB xHCI Compliant Host Controller
[19:35:16 173][Global][Inf]–DevPath:\?\pci#ven_8086&dev_1e31&subsys_77981462&rev_04#3&11583659&0&a0#{3abf6f2d-71c4-462a-8a92-1e6861e6af27}
[19:35:16 173][Global][Inf]---->Roothub:USB#ROOT_HUB30#4&21c61c84&0&0#{f18a0e88-c30c-11d0-8815-00a0c906bed8}
[19:35:16 173][Global][Inf]-------->[Port0]NoDeviceConnected
[19:35:16 173][Global][Inf]-------->[Port1]NoDeviceConnected
[19:35:16 173][Global][Inf]-------->[Port2]Other device
[19:35:16 173][Global][Inf]-------->[Port3]Other device
[19:35:16 173][Global][Inf]-------->[Port4]NoDeviceConnected
[19:35:16 174][Global][Inf]-------->[Port5]NoDeviceConnected
[19:35:16 174][Global][Inf]-------->[Port6]NoDeviceConnected
[19:35:16 174][Global][Inf]-------->[Port7]NoDeviceConnected
[19:35:16 174][Global][Inf]–Host: Intel(R) 7 Series/C216 Chipset Family USB Enhanced Host Controller - 1E26
[19:35:16 174][Global][Inf]–DevPath:\?\pci#ven_8086&dev_1e26&subsys_77981462&rev_04#3&11583659&0&e8#{3abf6f2d-71c4-462a-8a92-1e6861e6af27}
[19:35:16 174][Global][Inf]---->Roothub:USB#ROOT_HUB20#4&36624f0&0#{f18a0e88-c30c-11d0-8815-00a0c906bed8}
[19:35:16 236][Global][Inf]-------->[Port0]USB#VID_8087&PID_0024#5&e7ab62e&0&1#{f18a0e88-c30c-11d0-8815-00a0c906bed8}
[19:35:16 236][Global][Inf]---------->[Port0]NoDeviceConnected
[19:35:16 236][Global][Inf]---------->[Port1]NoDeviceConnected
[19:35:16 236][Global][Inf]---------->[Port2]NoDeviceConnected
[19:35:16 236][Global][Inf]---------->[Port3]NoDeviceConnected
[19:35:16 236][Global][Inf]---------->[Port4]NoDeviceConnected
[19:35:16 236][Global][Inf]---------->[Port5]NoDeviceConnected
[19:35:16 236][Global][Inf]-------->[Port1]NoDeviceConnected
[19:35:16 236][Global][Inf]–Scan USB host controller complete
[19:35:16 237][Global][Inf]–Update data center with HubMap
[19:35:16 237][Global][Inf]–Insert new hub2
[19:35:16 237][Global][Inf]–Update hub2 device data
[19:35:16 237][Global][Inf]–Update HUB2-1
[19:35:16 237][HUB2-1][Inf]–Update device path
[19:35:16 237][Global][Inf]–Update HUB2-2 \.\USB#VID_03EB&PID_3301#6&60e20e2&0&2#{f18a0e88-c30c-11d0-8815-00a0c906bed8}
[19:35:16 237][HUB2-2][Inf]–Update device path
[19:35:16 237][Global][Inf]–Update HUB2-3
[19:35:16 237][HUB2-3][Inf]–Update device path
[19:35:16 237][Global][Inf]–Update HUB2-4 \?\usb#vid_1b8e&pid_c003#6&60e20e2&0&4#{a5dcbf10-6530-11d2-901f-00c04fb951ed}
[19:35:16 237][HUB2-4][Inf]–Update device path
[19:35:16 237][Global][Inf]–Begin thread for HUB2-4
[19:35:16 237][Global][Inf]–Update HUB2-5
[19:35:16 237][HUB2-5][Inf]–Update device path
[19:35:16 237][Global][Inf]–Update HUB2-6
[19:35:16 237][HUB2-6][Inf]–Update device path
[19:35:16 237][Global][Inf]–Burning thread HUB2-4 start
[19:35:16 237][Global][Inf]–Burning thread HUB2-4 begin run
[19:35:18 766][Global][Inf]–User click open button
[19:35:21 380][Global][Inf]–Image path D:\Users2018\Boian\Desktop\updatee_MXIII-GII_rv112.img
[19:35:28 405][Global][Inf]–Parsing burning package
[19:35:28 405][Global][Inf]–Load configuration file C:\Program Files (x86)\Amlogic\USB_Burning_Tool\temp
[19:35:28 405][Global][Inf]–Parse burning configuration file C:\Program Files (x86)\Amlogic\USB_Burning_Tool\temp\burn_config.xml
[19:35:28 408][Global][Inf]–Get burning key
[19:35:29 899][Global][Inf]–User click start button
[19:35:29 900][Global][Inf]–SetErase
[19:35:29 900][Global][Inf]–Enable burning 1
[19:35:29 900][Global][Inf]–Scan usb device
[19:35:29 900][Global][Inf]–Aml scan WorldCup Device
[19:35:29 901][Global][Inf]–Host: Intel(R) 7 Series/C216 Chipset Family USB Enhanced Host Controller - 1E2D
[19:35:29 901][Global][Inf]–DevPath:\?\pci#ven_8086&dev_1e2d&subsys_77981462&rev_04#3&11583659&0&d0#{3abf6f2d-71c4-462a-8a92-1e6861e6af27}
[19:35:29 901][Global][Inf]---->Roothub:USB#ROOT_HUB20#4&872a236&0#{f18a0e88-c30c-11d0-8815-00a0c906bed8}
[19:35:29 901][Global][Inf]-------->[Port0]USB#VID_8087&PID_0024#5&36eec816&0&1#{f18a0e88-c30c-11d0-8815-00a0c906bed8}
[19:35:29 901][Global][Inf]---------->[Port0]NoDeviceConnected
[19:35:29 901][Global][Inf]---------->[Port1]USB#VID_03EB&PID_3301#6&60e20e2&0&2#{f18a0e88-c30c-11d0-8815-00a0c906bed8}
[19:35:29 902][Global][Inf]------------>[Port0]Other device
[19:35:29 902][Global][Inf]------------>[Port1]NoDeviceConnected
[19:35:29 902][Global][Inf]------------>[Port2]NoDeviceConnected
[19:35:29 902][Global][Inf]------------>[Port3]Other device
[19:35:29 902][Global][Inf]---------->[Port2]Other device
[19:35:29 903][Global][Inf]---------->[Port3]\?\usb#vid_1b8e&pid_c003#6&60e20e2&0&4#{a5dcbf10-6530-11d2-901f-00c04fb951ed}
[19:35:29 903][Global][Inf]---------->[Port4]NoDeviceConnected
[19:35:29 903][Global][Inf]---------->[Port5]NoDeviceConnected
[19:35:29 903][Global][Inf]-------->[Port1]NoDeviceConnected
[19:35:29 903][Global][Inf]–Host: USB xHCI Compliant Host Controller
[19:35:29 903][Global][Inf]–DevPath:\?\pci#ven_8086&dev_1e31&subsys_77981462&rev_04#3&11583659&0&a0#{3abf6f2d-71c4-462a-8a92-1e6861e6af27}
[19:35:29 903][Global][Inf]---->Roothub:USB#ROOT_HUB30#4&21c61c84&0&0#{f18a0e88-c30c-11d0-8815-00a0c906bed8}
[19:35:29 903][Global][Inf]-------->[Port0]NoDeviceConnected
[19:35:29 903][Global][Inf]-------->[Port1]NoDeviceConnected
[19:35:29 903][Global][Inf]-------->[Port2]Other device
[19:35:29 904][Global][Inf]-------->[Port3]Other device
[19:35:29 904][Global][Inf]-------->[Port4]NoDeviceConnected
[19:35:29 904][Global][Inf]-------->[Port5]NoDeviceConnected
[19:35:29 904][Global][Inf]-------->[Port6]NoDeviceConnected
[19:35:29 904][Global][Inf]-------->[Port7]NoDeviceConnected
[19:35:29 904][Global][Inf]–Host: Intel(R) 7 Series/C216 Chipset Family USB Enhanced Host Controller - 1E26
[19:35:29 904][Global][Inf]–DevPath:\?\pci#ven_8086&dev_1e26&subsys_77981462&rev_04#3&11583659&0&e8#{3abf6f2d-71c4-462a-8a92-1e6861e6af27}
[19:35:29 904][Global][Inf]---->Roothub:USB#ROOT_HUB20#4&36624f0&0#{f18a0e88-c30c-11d0-8815-00a0c906bed8}
[19:35:29 914][HUB2-4][Inf]–Open device handle \?\usb#vid_1b8e&pid_c003#6&60e20e2&0&4#{a5dcbf10-6530-11d2-901f-00c04fb951ed} 0x00000a00
[19:35:29 965][HUB2-4][Inf]–CloneImageProxy
[19:35:29 965][HUB2-4][Inf]–Connect path=Intel(R) 7 Series/C216 Chipset Family USB Enhanced Host Controller - 1E2D/P0/P0/P3
[19:35:29 965][HUB2-4][Inf]–Start burning…
[19:35:29 967][Global][Inf]-------->[Port0]USB#VID_8087&PID_0024#5&e7ab62e&0&1#{f18a0e88-c30c-11d0-8815-00a0c906bed8}
[19:35:29 967][Global][Inf]---------->[Port0]NoDeviceConnected
[19:35:29 967][Global][Inf]---------->[Port1]NoDeviceConnected
[19:35:29 967][Global][Inf]---------->[Port2]NoDeviceConnected
[19:35:29 967][Global][Inf]---------->[Port3]NoDeviceConnected
[19:35:29 967][Global][Inf]---------->[Port4]NoDeviceConnected
[19:35:29 967][Global][Inf]---------->[Port5]NoDeviceConnected
[19:35:29 967][Global][Inf]-------->[Port1]NoDeviceConnected
[19:35:29 967][Global][Inf]–Scan USB host controller complete
[19:35:29 967][Global][Inf]–Update data center with HubMap
[19:35:29 967][Global][Inf]–Update hub2 device data
[19:35:29 967][Global][Inf]–Update HUB2-1
[19:35:29 967][HUB2-1][Inf]–Update device path
[19:35:29 967][Global][Inf]–Update HUB2-2 \.\USB#VID_03EB&PID_3301#6&60e20e2&0&2#{f18a0e88-c30c-11d0-8815-00a0c906bed8}
[19:35:29 967][HUB2-2][Inf]–Update device path
[19:35:29 967][Global][Inf]–Update HUB2-3
[19:35:29 967][HUB2-3][Inf]–Update device path
[19:35:29 967][Global][Inf]–Update HUB2-4 \?\usb#vid_1b8e&pid_c003#6&60e20e2&0&4#{a5dcbf10-6530-11d2-901f-00c04fb951ed}
[19:35:29 967][HUB2-4][Inf]–Update device path
[19:35:29 967][Global][Inf]–Update HUB2-5
[19:35:29 967][HUB2-5][Inf]–Update device path
[19:35:29 967][Global][Inf]–Update HUB2-6
[19:35:29 967][HUB2-6][Inf]–Update device path
[19:35:30 016][HUB2-4][Inf]--------------ERASE BOOTLOADER------------
[19:35:30 017][HUB2-4][Inf]–0-7-0-16
[19:35:30 017][HUB2-4][Inf]–Identify status success
[19:35:30 017][HUB2-4][Inf]-- low_power
[19:35:30 022][HUB2-4][Inf]–Low power command success
[19:35:30 026][HUB2-4][Inf]–Read low power success
[19:35:30 026][HUB2-4][Inf]–bootloader_is_old
[19:35:30 026][HUB2-4][Inf]–Bootloader command success
[19:35:30 031][HUB2-4][Err]–failed: bootloader is new
[19:35:30 031][HUB2-4][Inf]–Bootloader is new
[19:35:30 032][HUB2-4][Inf]-------------Download DDR.USB-----------
[19:35:30 032][HUB2-4][Inf]–Close device handle 0x00000a00
[19:35:30 082][HUB2-4][Inf]–Open device handle \?\usb#vid_1b8e&pid_c003#6&60e20e2&0&4#{a5dcbf10-6530-11d2-901f-00c04fb951ed} 0x000007d4
[19:35:30 134][HUB2-4][Inf]–0-7-0-16
[19:35:30 134][HUB2-4][Inf]–No need download
[19:35:30 134][HUB2-4][Inf]-------------Download UBOOT.USB-----------
[19:35:30 135][HUB2-4][Inf]–0-7-0-16
[19:35:30 135][HUB2-4][Inf]–No need download
[19:35:30 135][HUB2-4][Inf]-- low_power
[19:35:30 141][HUB2-4][Inf]–Send command success
[19:35:30 144][HUB2-4][Inf]–Read command status success
[19:35:30 144][HUB2-4][Inf]-------------Download meson1.dtb-----------
[19:35:30 145][HUB2-4][Inf]–0-7-0-16
[19:35:30 145][HUB2-4][Inf]-- download mem dtb normal 88064
[19:35:30 146][HUB2-4][Inf]–Send download command success
[19:35:30 158][HUB2-4][Inf]–Read command status success
[19:35:30 172][HUB2-4][Inf]–Transfer complete
[19:35:30 172][HUB2-4][Inf]–Send download get_status command succeed
[19:35:30 176][HUB2-4][Inf]–get_status success
[19:35:30 677][HUB2-4][Inf]-------------ERASE FLASH-----------
[19:35:30 677][HUB2-4][Inf]–disk_initial 1
[19:35:30 677][HUB2-4][Inf]–Send command success
[19:35:31 874][HUB2-4][Err]–failed:[19:35:31 874][HUB2-4][Err]–Check command return failed
[19:35:31 878][HUB2-4][Err]–[0x30201004]UBOOT/Disk initialize/Send command/Error result
[19:35:31 878][HUB2-4][Inf]–Close device handle 0x000007d4

Trying different versions of CoreELEC for specific devices is just wrong, wrong, wrong.

You do not need to short pins and I would advise against this incase you touch the wrong pins and fry the SoC, I have purposefully bricked one of my boxes in the past by zero’ing the whole eMMC to see how recoverable these boxes where and because I wanted to try doing some bootloader development.

As I said earlier I have come back from the worst possible case of bricking you can do, there is always a way to recover these boxes.

Firstly you need the vendor firmware for your specific box and you have not stated what your device is.

Secondly this is the guide I followed to recover from a completely bricked device, if you follow it then you should have no issues in restoring your device.

The name of the box is in the title:)
https://www.gearbest.com/tv-box-mini-pc/pp_580669.html?wid=1433363
This is the exact one I have, I will continue now to read and follow the guide you linked me.
Thanks ,will come back after I tried that.

I totally missed that, sorry.

That looks to be the firmware, I’m not sure if it is the full image though as it seem’s to be rather small.

I burnt this two images on the SD card with Burn Card Maker :
“update_MXIII-GII_rv109”
https://www.gearbest.com/blog/download/mxiii-g-ii-tv-box-update-firmware-1284

“update_MXIII-GII_rv112”

And as stated above I get a progress bar that gets stuck forever at like 5%.


The one from China Gadgets Reviews is the “update_MXIII-GII_rv112.img” one same as the one from Entertainment Box website.
The “update_MXIII-GII_rv112.img” has 743 MB.
The “update_MXIII-GII_rv109.img” has 885 MB.

Tried them both on USB Burning Tool and with the Burn Card Maker and both seem to get stuck around 5 to 10%, as in the picture.

Although GearBest already has the “update_MXIII-GII_rv109.img” version on their site I asked them for another one but they said they can’t help me because the one year warranty has passed.
I cant find the site of the manufacturer either.

Well the good news is your box isn’t bricked per se, I’d imagine that is an upgrade image though hence it won’t go over 5%, you need the full image for this to work.

Your box not booting CoreELEC is nothing to do with the DTB, I would image u-boot is missing from the eMMC and that is why you are getting no video signal.

One option that should work but I have not tested is to burn the S912 image and then add u-boot to it from that upgrade image. If you have access to a linux PC then it’s easy.

sudo dd if=aml_sdc_burn.UBOOT of=/dev/sdX bs=1 count=442
sudo dd if=aml_sdc_burn.UBOOT of=/dev/sdX seek=1 skip=1 bs=512

You would have to replace /dev/sdX with the device-node for your SD card, this method does not work with USB.

This is the u-boot I have extracted from that image aml_sdc_burn.UBOOT (912.5 KB).

1 Like

This is exactly what I was asking for, I flashed an ubuntu image on a usb pen drive for this, but I am very unfamiliar with this things so could you please walk me trough every step and command line I need to type into the terminal?

Should I open the terminal where aml_sdc_burn.UBOOT is placed then just enter the two commands with the correct sdX?

The process of shorting NAND pins is a valid and well recognized recovery method for extreme bricks and I have used it myself when flashes corrupted the boot loader. It is a standard method for recovering Khadas products and described on their own forum and website. It is not described for most boxes since most boxes are not documented.

Here is a thread where it is discussed for various different boxes:

Shoog

Thanks a lot , did what you said and it boots into Kodi just fine even Wi-Fi and everything seems to work :slight_smile:

As I said all boxes can be unbricked, it’s just knowing how.

The best thing to do now would be to install that u-boot image into the bootloader partition so you can boot from our stock images.

Copy the u-boot file to your device and SSH into CoreELEC and do dd if=/storage/aml_sdc_burn.UBOOT of=/dev/bootloader

Confirm everything is okay by burning our S912 image again to a seperate flash drive/sdcard and try to boot from it.

Sorry for the delay, here is what I did.
I went ahead and burnt another card with a S912 image.
I booted ubuntu on my pc , downloaded the aml_sdc_burn.UBOOT file.
Opened a terminal and did:

scp ~/Downloads/aml_sdc_burn.UBOOT root@192.168.1.42:/storage
ssh root@192.168.1.42
dd if=/storage/aml_sdc_burn.UBOOT of=/dev/bootloader

Then I inserted the card with the stock image in the box and it still didn’t boot.

Also , I bought a higher speed card and tried burning the firmware again on the new card and this is what I get now:

Sorry this is your bootloader file bootloader.PARTITION (912 KB)
the other was the recovery bootloader.

dd if=/storage/recovery.PARTITION of=/dev/bootloader

I did this again with the bootloader.PARTITION file.

Did :
scp ~/Downloads/bootloader.PARTITION root@192.168.1.42:/storage
And got :
bootloader.PARTITION 100% 912KB 8.0MB/s 00:00
Did :
ssh root@192.168.1.42
Did :
dd if=/storage/bootloader.PARTITION of=/dev/bootloader
And got :
1824+0 records in
1824+0 records out
933888 bytes (912.0KB) copied, 0.009870 seconds, 90.2MB/s

And it still does not boot with the stock image.

It’s not supposed to help you boot the stock image, it’s supposed to help you boot from USB/SD without having to write u-boot manually each time.

Unless you can get the stock Android image then you will not be able to boot it again, you can however install CE on the internal memory.